
Super User
User Module API
The User Module is implemented with the plg_jbackend_user plugin. It provides functions related to Joomla users and ACL. Here is the list of supported methods.
User login
Request parameters
action=post
module=user
resource=login
username=<username>
password=<password>
Example
<end-point>?action=post&module=user&resource=login&username=<username>&password=<password>
Example (REST format)
<end-point>/post/user/login?username=<username>&password=<password>
Response
{
    "status": "ok",
    "userid": <userid>,
    "username": "<username>",
    "session_id": "<session_id>"
}
User logout
Request parameters
action=get
module=user
resource=logout
Example
<end-point>?action=get&module=user&resource=logout
Example (REST format)
<end-point>/get/user/logout
Response
{
    "status": "ok"
}
User registration
Request parameters
action=post
module=user
resource=register
username=<username>
password=<password>
email=<email>
firstname=<firstname>
lastname=<lastname>
Example
<end-point>?action=post&module=user&resource=register&username=<username>&password=<password>&email=<email>&firstname=<firstname>&lastname=<lastname>
Example (REST format)
<end-point>/post/user/register?username=<username>&password=<password>&email=<email>&firstname=<firstname>&lastname=<lastname>
Response
{
    "status": "ok"
}
User remind
Sends an email to the user's account with a password remind link.
Request parameters
action=get
module=user
resource=remind
email=<email>
Example
<end-point>?action=get&module=user&resource=remind
Example (REST format)
<end-point>/get/user/remind
Response
{
    "status": "ok"
}
User reset
Sends an email to the user's account with a password reset link.
Request parameters
action=get
module=user
resource=reset
email=<email>
Example
<end-point>?action=get&module=user&resource=reset
Example (REST format)
<end-point>/get/user/reset
Response
{
    "status": "ok"
}
User profile
Request parameters
action=get
module=user
resource=profile
Example
<end-point>?action=get&module=user&resource=profile
Example (REST format)
<end-point>/get/user/profile
Response
{
    "status": "ok",
    "fields": [
        {
            "id": "<id>",
            "title": "<title>",
            "name": "<name>",
            "language": "<language>",
            "type": "<type>",
            "default_value": "<default value>",
            "context": "<context>",
            "group_id": "<group id>",
            "label": "<label>",
            "description": "<description>",
            "required": "<required>",
            "language_title": "<language title>",
            "language_image": "<language image>",
            "group_title": "<group title>",
            "value": "<value>",
            "rawvalue": "<raw value>"
        },
        ...
    ],
    "_errors": [<_errors>],
    "groups": {
        "<groupid>": "<groupid>"
        ...
    },
    "id": "<id>",
    "name": "<name>",
    "username": "<username>",
    "email": "<email>",
    "block": "<block>",
    "sendEmail": "<sendEmail>",
    "registerDate": "<registerDate>",
    "lastvisitDate": "<lastvisitDate>",
    "activation": "<activation>",
    "params": {
        "admin_style": "<admin_style>",
        "admin_language": "<admin_language>",
        "language": "<language>",
        "editor": "<editor>",
        "helpsite": "<helpsite>",
        "timezone": "<timezone>"
    },
    "lastResetTime": "<lastResetTime>",
    "resetCount": "<resetCount>",
    "otpKey": "<otpKey>",
    "otep": "<otep>",
    "requireReset": "<requireReset>",
    "tags": {
        "typeAlias": <typeAlias>,
        "tags": "<tags>"
    }
}
User profile update
Allows to update the user profile (user must be authenticated). The requests must use the POST method with a JSON payload.
Request parameters
action=put
module=user
resource=profile
Example
POST <end-point>?action=put&module=user&resource=profile
Example (REST format)
POST <end-point>/put/user/profile
JSON payload data:
{
    "name": "<name>",
    "username": "<username>",
    "password": "<password>",
    "email": "<email>",
    "profile": {
        "city": "<city>"
        ...
    },
    "com_fields": {
        "field-1": "<value 1>",
        "field-2": "<value 2>"
        ...
    }
}
Response
{
    "status": "ok"
}
User status
Allows to check the current status of the user (guest or logged in), and provides some additional information.
Request parameters
action=get
module=user
resource=status
Example
<end-point>?action=get&module=user&resource=status
Example (REST format)
<end-point>/get/user/status
Response
{
    "status": "ok",
    "is_guest": <0 or 1>,
    "user_id": "<user_id>",
    "session_id": "<session_id>",
    "session_expire": <session_expire>
}
Plugin Settings

The following options are available for user plugin:
| Option | Description |
| Auto activate | Automatically activate users on registration and skip any notification email. |
| Extended auth request | Process register, remind and reset as an authentication request (i.e. these requests can bypass the access restrictions on the endpoint). |
| Extended fields | Enable support for additional fields in the registration. |
| External libraries | List of paths (relative to JPATH_SITE) of external libraries to load in the registration (one path each row). |
| Required fields | List of fields to include in the response for profile requests (when blank it returns all fields). Fields must be separated by commas and square brackets for nested fields (e.g. id,name,username,profile[city,region,country]). |
| JSON Login | Enable JSON payload on login action. |
| JSON Register | Enable JSON payload on register action. |
| Enable session id | When enabled it overrides cookie based session with session_id parameter. This is useful when it is not possible to rely on cookie based session. This parameter can be passed as GET/POST param or as JSON field when JSON payload is enabled for the current request. |
Error Codes
The general format for any error response is the following:
{
    "status": "ko",
    "error_code": "<code>",
    "error_description": "<description>"
}
The following table includes all error codes with description, grouped by "realm".
KNN_KNIKunena not installed{"status":"ko","error_code":"KNN_KNI","error_description":"Kunena not installed"}
| Realm | Error code | Error description | JSON format |
|---|---|---|---|
| Module related error codes | REQ_ANS | Action not specified | {"status":"ko","error_code":"REQ_ANS","error_description":"Action not specified"} |
| REQ_MNS | Module not specified | {"status":"ko","error_code":"REQ_MNS","error_description":"Module not specified"} | |
| REQ_MNF | Module not found | {"status":"ko","error_code":"REQ_MNF","error_description":"Module not found"} | |
| REQ_RUN | Request unknown | {"status":"ko","error_code":"REQ_RNS","error_description":"Request unknown"} | |
| API key related error codes | REQ_AKR | API key required | {"status":"ko","error_code":"REQ_AKR","error_description":"API key required"} |
| REQ_AKL | API key limit exceeded | {"status":"ko","error_code":"REQ_AKL","error_description":"API key limit exceeded"} | |
| REQ_AKE | API key expired | {"status":"ko","error_code":"REQ_AKE","error_description":"API key expired"} | |
| REQ_AKI | API key invalid | {"status":"ko","error_code":"REQ_AKI","error_description":"API key invalid"} | |
| REQ_AKG | API key generic error | {"status":"ko","error_code":"REQ_AKG","error_description":"API key generic error"} | |
| User authentication related error codes | REQ_UCA | Unable to check authentication | {"status":"ko","error_code":"REQ_UCA","error_description":"Unable to check authentication"} |
| REQ_AUR | Authentication required | {"status":"ko","error_code":"REQ_AUR","error_description":"Authentication required"} | |
| User module | USR_LIF | Login failed | {"status":"ko","error_code":"USR_LIF","error_description":"Login failed"} |
| USR_LOF | Logout failed | {"status":"ko","error_code":"USR_LOF","error_description":"Logout failed"} | |
| USR_UNR | Username required | {"status":"ko","error_code":"USR_UNR","error_description":"Username required"} | |
| USR_PWR | Password required | {"status":"ko","error_code":"USR_PWR","error_description":"Password required"} | |
| USR_EMR | Email required | {"status":"ko","error_code":"USR_EMR","error_description":"Email required"} | |
| USR_NMR | Name required | {"status":"ko","error_code":"USR_NMR","error_description":"Name required"} | |
| USR_ALI | Already logged in | {"status":"ko","error_code":"USR_NMR","error_description":"Already logged in"} | |
| USR_UNE | User not enabled | {"status":"ko","error_code":"USR_UNE","error_description":"User not enabled"} | |
| USR_RNA | Registration not allowed | {"status":"ko","error_code":"USR_RNA","error_description":"Registration not allowed"} | |
| USR_IRF | Invalid registration field | {"status":"ko","error_code":"USR_IRF","error_description":"Invalid registration field"} | |
| USR_UNL | User not logged in | {"status":"ko","error_code":"USR_UNL","error_description":"User not logged in"} | |
| USR_UNE | User not enabled | {"status":"ko","error_code":"USR_UNE","error_description":"User not enabled"} | |
| USR_EDR | Error during registration | {"status":"ko","error_code":"USR_EDR","error_description":"Error during registration"} | |
| USR_UAX | Username already exists | {"status":"ko","error_code":"USR_UAX","error_description":"Username already exists"} | |
| USR_EAX | Email already exists | {"status":"ko","error_code":"USR_EAX","error_description":"Email already exists"} | |
| USR_RRE | Reset request error | {"status":"ko","error_code":"USR_RRE","error_description":"Reset request error"} | |
| USR_RRF | Reset request failed | {"status":"ko","error_code":"USR_RRF","error_description":"Reset request failed"} | |
| Content module | CNT_ANF | Article not found | {"status":"ko","error_code":"CNT_ANF","error_description":"Article not found"} |
| CNT_AGE | Article generic error | {"status":"ko","error_code":"CNT_AGE","error_description":"Article generic error"} | |
| CNT_ANA | Access not authorized | {"status":"ko","error_code":"CNT_ANA","error_description":"Access not authorized"} | |
| CNT_CNF | Category not found | {"status":"ko","error_code":"CNT_CNF","error_description":"Category not found"} | |
| CNT_NCF | No categories found | {"status":"ko","error_code":"CNT_NCF","error_description":"No categories found"} | |
| CNT_TNS | Tag not specified | {"status":"ko","error_code":"CNT_TNS","error_description":"Tag not specified"} | |
| CNT_TGE | Tag generic error | {"status":"ko","error_code":"CNT_TGE","error_description":"Tag generic error"} | |
| CNT_ANS | Alias not specified | {"status":"ko","error_code":"CNT_ANS","error_description":"Alias not specified"} | |
| Push module | PSH_TNS | Token not specified | {"status":"ko","error_code":"PSH_TNS","error_description":"Token not specified"} |
| PSH_ANS | App code not specified | {"status":"ko","error_code":"PSH_ANS","error_description":"App code not specified"} | |
| PSH_PNS | Platform not specified | {"status":"ko","error_code":"PSH_PNS","error_description":"Platform not specified"} | |
| PSH_PUN | Platform unknown | {"status":"ko","error_code":"PSH_PUN","error_description":"Platform unknown"} | |
| PSH_ESA | Error saving app code | {"status":"ko","error_code":"PSH_ESA","error_description":"Error saving app code"} | |
| PSH_AUN | Application unknown | {"status":"ko","error_code":"PSH_AUN","error_description":"Application unknown"} | |
| PSH_ESD | Error saving device | {"status":"ko","error_code":"PSH_ESD","error_description":"Error saving device"} | |
| PSH_ECN | Error creating notification | {"status":"ko","error_code":"PSH_ECN","error_description":"Error creating notification"} | |
| PSH_IAT | Invalid authorization token | {"status":"ko","error_code":"PSH_IAT","error_description":"Invalid authorization token"} | |
| Menu module | MNU_MNS | Menu not specified | {"status":"ko","error_code":"MNU_MNS","error_description":"Menu not specified"} |
| MNU_INF | Item not found | {"status":"ko","error_code":"MNU_INF","error_description":"Item not found"} | |
| MNU_NIF | No items found | {"status":"ko","error_code":"MNU_NIF","error_description":"No items found"} | |
| SobiPro module | SP_SNI | SobiPro not installed | {"status":"ko","error_code":"SP_SNI","error_description":"SobiPro not installed"} |
| SP_SNS | Section not specified | {"status":"ko","error_code":"SP_SNS","error_description":"Section not specified"} | |
| SP_CNS | Category not specified | {"status":"ko","error_code":"SP_CNS","error_description":"Category not specified"} | |
| SP_PNS | Parent not specified | {"status":"ko","error_code":"SP_PNS","error_description":"Parent not specified"} | |
| SP_SGE | Section generic error | {"status":"ko","error_code":"SP_SGE","error_description":"Section generic error"} | |
| SP_NSF | No sections found | {"status":"ko","error_code":"SP_NSF","error_description":"No sections found"} | |
| SP_SNF | Section not found | {"status":"ko","error_code":"SP_SNF","error_description":"Section not found"} | |
| SP_CGE | Category generic error | {"status":"ko","error_code":"SP_CGE","error_description":"Category generic error"} | |
| SP_NCF | No categories found | {"status":"ko","error_code":"SP_NCF","error_description":"No categories found"} | |
| SP_CNF | Category not found | {"status":"ko","error_code":"SP_CNF","error_description":"Category not found"} | |
| SP_EGE | Entry generic error | {"status":"ko","error_code":"SP_EGE","error_description":"Entry generic error"} | |
| SP_NEF | No entries found | {"status":"ko","error_code":"SP_NEF","error_description":"No entries found"} | |
| SP_ENF | Entry not found | {"status":"ko","error_code":"SP_ENF","error_description":"Entry not found"} | |
| ZOO module | ZOO_ZNI | ZOO not installed | {"status":"ko","error_code":"ZOO_ZNI","error_description":"ZOO not installed"} |
| ZOO_ZNS | ZOO app not specified | {"status":"ko","error_code":"ZOO_ZNS","error_description":"ZOO app not specified"} | |
| ZOO_INF | Item not found | {"status":"ko","error_code":"ZOO_INF","error_description":"Item not found"} | |
| ZOO_ANA | Access not authorized | {"status":"ko","error_code":"ZOO_ANA","error_description":"Access not authorized"} | |
| ZOO_CNS | Category not specified | {"status":"ko","error_code":"ZOO_CNS","error_description":"Category not specified"} | |
| ZOO_CNF | Category not found | {"status":"ko","error_code":"ZOO_CNF","error_description":"Category not found"} | |
| ZOO_NCF | No categories found | {"status":"ko","error_code":"ZOO_NCF","error_description":"No categories found"} | |
| Kunena module | KNN_KNI | Kunena not installed | {"status":"ko","error_code":"KNN_KNI","error_description":"Kunena not installed"} |
| KNN_NTF | No topic found | {"status":"ko","error_code":"KNN_NTF","error_description":"No topic found"} | |
| K2 module | K2_KNI | K2 not installed | {"status":"ko","error_code":"K2_KNI","error_description":"K2 not installed"} |
| K2_NUF | No users found | {"status":"ko","error_code":"K2_NUF","error_description":"No users found"} | |
| K2_INF | Item not found | {"status":"ko","error_code":"K2_INF","error_description":"Item not found"} | |
| K2_IGE | Item generic error | {"status":"ko","error_code":"K2_IGE","error_description":"Item generic error"} | |
| K2_ANA | Access not authorized | {"status":"ko","error_code":"K2_ANA","error_description":"Access not authorized"} | |
| K2_CNF | Category not found | {"status":"ko","error_code":"K2_CNF","error_description":"Category not found"} | |
| K2_NCF | No categories found | {"status":"ko","error_code":"K2_NCF","error_description":"No categories found"} | |
| K2_CGE | Category generic error | {"status":"ko","error_code":"K2_CGE","error_description":"Category generic error"} | |
| Search module | - | - | - |
| Community Builder module | CB_CNI | Community Builder not installed | {"status":"ko","error_code":"CB_CNI","error_description":"Community Builder not installed"} |
| CB_EAD | Error accessing database | {"status":"ko","error_code":"CB_EAD","error_description":"Error accessing database"} | |
| CB_UNS | User not specified | {"status":"ko","error_code":"CB_UNS","error_description":"User not specified"} | |
| CB_UNF | User not found | {"status":"ko","error_code":"CB_UNF","error_description":"User not found"} | |
| CB_MFM | Mandatory field missing | {"status":"ko","error_code":"CB_MFM","error_description":"Mandatory field missing"} | |
| CB_PUF | Profile update failed | {"status":"ko","error_code":"CB_PUF","error_description":"Profile update failed"} | |
| Release System module | REL_PNS | Package not specified | {"status":"ko","error_code":"REL_PNS","error_description":"Package not specified"} |
| REL_ENS | Email not specified | {"status":"ko","error_code":"REL_ENS","error_description":"Email not specified"} | |
| REL_UNS | Username not specified | {"status":"ko","error_code":"REL_UNS","error_description":"Username not specified"} | |
| REL_PWD | Password not specified | {"status":"ko","error_code":"REL_PWD","error_description":"Password not specified"} | |
| REL_KNS | Key not specified | {"status":"ko","error_code":"CB_MFM","error_description":"Key not specified"} | |
| REL_KNR | Key not required | {"status":"ko","error_code":"REL_KNR","error_description":"Key not required"} | |
| REL_PNF | Package not found | {"status":"ko","error_code":"REL_PNF","error_description":"Package not found"} | |
| REL_PNE | Package not exists | {"status":"ko","error_code":"REL_PNE","error_description":"Package not exists"} | |
| REL_GNS | Group not specified | {"status":"ko","error_code":"REL_GNS","error_description":"Group not specified"} | |
| REL_GNF | Group not found | {"status":"ko","error_code":"REL_GNF","error_description":"Group not found"} | |
| REL_UNF | User not found | {"status":"ko","error_code":"REL_UNF","error_description":"User not found"} | |
| REL_UNA | User not authorized | {"status":"ko","error_code":"REL_UNA","error_description":"User not authorized"} | |
| REL_INK | Invalid key | {"status":"ko","error_code":"REL_INK","error_description":"Invalid key"} | |
| REL_ESK | Error sending key | {"status":"ko","error_code":"REL_ESK","error_description":"Error sending key"} | |
| REL_LIF | Login failed | {"status":"ko","error_code":"REL_LIF","error_description":"Login failed"} | |
| REL_UNE | User not enabled | {"status":"ko","error_code":"REL_UNE","error_description":"User not enabled"} |
Usage
Once an end-point is published the web clients can start to make HTTP requests and consume services provided by jBackend API. It is possible to test if all is working as expected using any REST client that allows to build custom HTTP requests (much better if the client supports JSON decode to better show server responses). Some good clients are available as browser plugin for both Firefox and Chrome. We suggest REST Easy for Firefox and Postman - REST Client for Chrome.
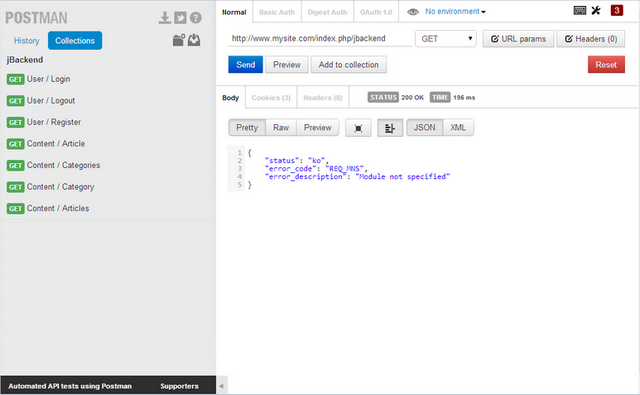
Let's assume the end-point menu item can be accessed with the following URL:
http://www.mysite.com/index.php/jbackend
Calling just the URL without any parameter we will get the following JSON response:
{
    "status": "ko",
    "error_code": "REQ_MNS",
    "error_description": "Module not specified"
}
Note that the HTTP Response Code is always 200 even in case of errors. The error condition is reported by the "status" value (ok, ko). Additional information about the error can be found in the "error_code" and the "error_description" values.
To check jBackend features it is available a sandbox with the last version of jbackend and all modules installed, and free access type on the end-point. To play with the sandbox a Postman collection is available to download here:
http://www.selfget.com/downloads/file/41-jbackapp-postman-collection.html
It needs only to be imported into Postman and is ready to play.
Push Notifications
jBackend includes a fully featured platform for sending Push Notifications over Google GCM (Android) and Apple APNs (iOS). Moreover, it supports multiple mobile applications, and you can manage them all from a single Joomla installation.
The component interface includes functions to manage Apps, Devices and Notifications, and there's a Push module to interact with jBackend from the outside (e.g. to send registration token from your app or start the push notification sending process).
Initial configuration
The first thing to do just after installation is to enable jBackend basic plugins. To do this go to menu "Extensions" -> "Plug-in Manager", and filter plugin list for type "jbackend".

Each one of these plugins has some configurable options, so it is enough to click on "Status" buttons to enable the plugins, but it is necessary to edit a plugin to change its settings.
Note that when a plugin is disabled the API functions it provides will NOT be available.
To start using jBackend it is a good practice to publish an "end-point". This is a Joomla menu item which provides a defined URL to access to jBackend APIs (the one associated with the menu link), and can be configured as needed using menu item's options. To create an end-point go to "Menus" -> "Menu Manager", click on the menu that will contain the end-point (or create a new menu, like an hidden menu) and add a new menu item.
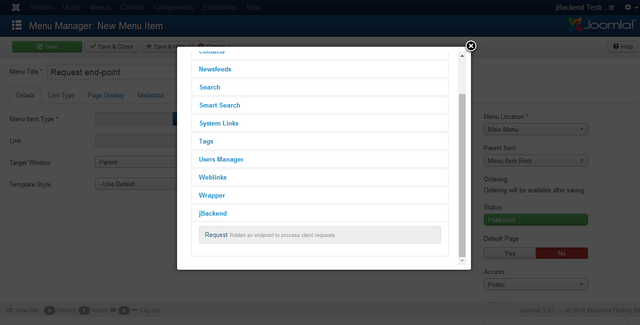
Select a menu type "jBackend" -> "Request" and set the "Access type" in the "Options" tab, and other options available for the current endpoint.
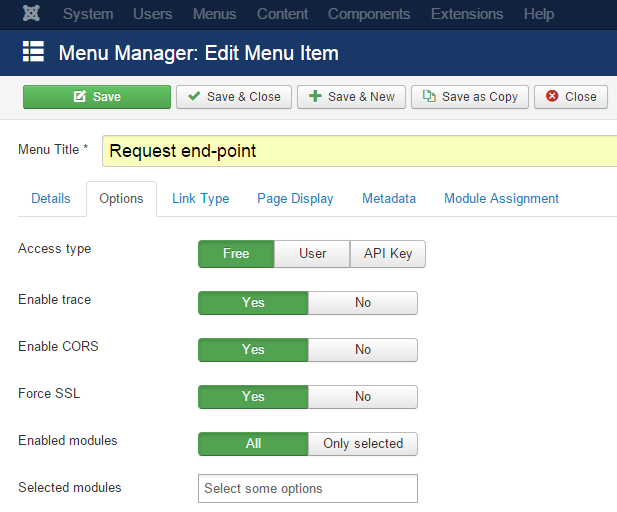
The following options are available for each endpoint:
| Option | Description |
| Access type | Specify the kind of access allowed by the endpoint. |
| Enable trace | Enable or disable the logging of each request made at this endpoint. |
| Enable CORS | Add Access-Control-Allow-Origin: * to the response header. |
| Force SSL | Redirect any request on http to the same request on https. |
| Enabled modules | Specify which modules to expose and make accessible on the endpoint (all modules or only selected modules). |
| Selected modules | The list of modules enabled on the endpoint. This option is applied only when "Enabled modules" is "Only selected". |
Currently jBackend supports the following access type:
| Access type | Description |
| Free | End-point can be consumed without any authentication or limitation, just like a guest user can browse the site's pages and with the same restrictions. This means that if an article is restricted to "Register users" only, it will be not accessible for guests even on the end-point, but the client needs to authenticate himself, using the login service. Native ACL are always satisfied with any access type and this should be respected also in case of custom module development. |
| User | End-point usage is restricted to authenticated users only. To consume services the first call must be to login service. If the user can login to the site, then the same credentials are authorized to use the end-point. |
| API Key | End-point needs a valid API Key for each request. The request must include the api_key=<KEY> parameter or it will be rejected. More details on API Key features can be found in the dedicated section. |
Note that APIs could be accessed without to publish any end-point, just calling the jBackend component with http://<siteurl>/index.php?option=com_jbackend&<params> (default requests). For this reasons there are global options defined as default and used for such situations. These general options can be accessed by the "Options" button in the jBackend panel. For security reasons the default access is set to "API Key".
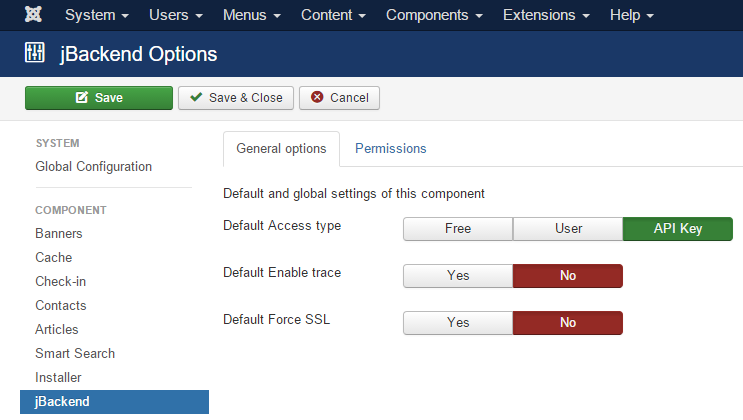
The following global options are available:
| Option | Description |
| Default Access type | Specify the kind of access allowed by the default endpoint. |
| Default Enable trace | Enable or disable the logging of each request made on the default endpoint. |
| Default Force SSL | Redirect any request on http to the same request on https on the default endpoint. |
REST format
If Joomla SEF is enabled, the endpoint can serve requests with the REST format (e.g. /get/content/articles/<N>).

Introduction
jBackend is a Joomla extension that introduces a set of APIs for access to all Joomla's content and features, and easily integrate any Joomla site with any external system. It extends the power of Joomla allowing you to use your site as a "backend system" to serve and feed any kind of client (mobile apps, news channels, affiliate sites, and any other external system).
jBackend also provides a full push notifications platform for iOS and Android mobile apps. It is possible to manage multiple apps, to register devices for each app, and to schedule push notifications sending on registered devices, filtered by app and platform type.
jBackend is designed to be "extensible" via plugins. Adding new plugins means to add new APIs to support new Joomla extensions. The basic package already includes three plugins, the User Module (that supports Joomla users and ACL), the Content Module (for the standard Joomla content, categories and articles), and the Push Module (to work with push notifications). New plugins are on the way, to add support for the most used Joomla extensions (e.g. K2, Zoo, VirtueMart, HikaShop, and so on). Additional plugins can be installed separately, so you can install and use only the necessary modules, and keep your CMS lightweight and efficient.
jBackend access is possible through an "end-point", that can be published like a menu item. It is possible to publish several end-points and configure access rules separately for each one. The access can be free, or restricted with a standard user login or through the use of an API Key. API Keys can be generated and configured (e.g. in terms of limitations like expiration or daily access) in jBackend panel. This allows full control on API access provided to clients.
It is possible to enable requests tracking for each endpoint separately. In this way all requests received from the endpoint are stored in the database and can be used for security audit or for statistical analysis.
It is also possible to enable specific modules for each endpoint separately. This increase the control level on the pool of functions or services to expose for each endpoint.
End-point channels can be accessed through HTTP, requests can be compliant to RESTful pattern, and responses are JSON encoded. In the future is expected to support the ability to provide XML responses.
Installation procedure
jBackend basic extension has just one package to download and install. The package includes the component and three plugins (User Module, Content Module, and Push Module), and support the installation with "upgrade" mode, so there’s no need to uninstall any previous installed version.
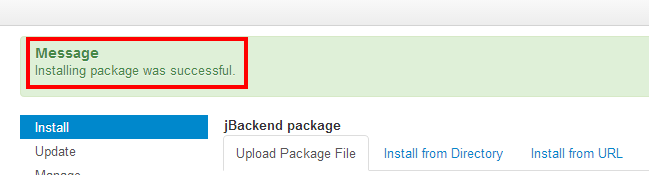
To install jBackend, login to Joomla backend as administrator, and go to menu "Extension Manager". Click the browse button, select the package file (jBackendX.X_J3.zip) and click the installation button.

The package will be uploaded on the server and then installed. After installation finished a message will report a successful message.
That’s all. Now we are ready to start using jBackend.
Upgrade procedure
When upgrading from a previous version of jBackend, there is no need to first uninstall the old package. As mentioned earlier, jBackend supports the "upgrade" mode for the installation, so is enough to just install the new package over the old one. The component and the three plugins included in the basic package will be upgraded.
Note that during the upgrade also the database tables are upgraded when needed, but without to delete or loose any table data. It is in charge of the installation process to upgrade tables structure if needed. All the data (e.g. API Keys) will be preserved.
Index
Introduction
Installation procedure
Initial configuration
Usage
Keys
Logs
Apps
Devices
Notifications
User Module API
Content Module API
Push Module API
Menu Module API
K2 Module API
SobiPro Module API
ZOO Module API
Kunena Module API
Search Module API
Community Builder Module API
Release System Module API
Error Codes
Developer's guide
Changelog
jBackend
jBackend is a Joomla extension that gives you all the power of Joomla CMS through an extensible and pluggable set of REST API. With these API you can access to all site's contents and features, and use Joomla as a backend system for smartphone and mobile apps, syndication networks, external websites, and provide web services for any external system.
Furthermore jBackend provides a full push notifications platform for iOS and Android mobile apps. It allows to define multiple apps, to register devices for each app, and to schedule push notifications sending on registered devices, filtered by app and platform type.
Features
- Extensible through plugins to increase API and support any Joomla extension;
- Support for publishing of multiple endpoints, each with its specific settings;
- Three endpoint access type (free access, user authenticated only, API Key required);
- Tracing requests in the database for each endpoint;
- Selection of jBackend plugins to enable for each endpoint;
- API Key management interface;
- Request log management interface;
- Each API Key can have a max daily requests limit and an expiration date;
- Each API Key can be targeted on separate endpoints;
- Access control is compliant with integrated ACL;
- Support for REST compliant requests;
- JSON format for responses;
- Support for push notifications on iOS (APNs) and Android (GCM);
- Custom payload for push notifications;
- Scheduled sending of push notifications;
- Push notifications can be create and scheduled via API call;
- Push notifications can be targeted on selected users or groups.

The basic extension package includes the jBackend component, that provides the general infrastructure for endpoints, notifications, and plugins support system. Also the following plugins are already included in the basic package:
- User Module: provides support for Joomla users (e.g. login, logout, registration);
- Content Module: provides support for standard Joomla content (e.g. categories and articles);
- Push Module: provides support for push notifications (e.g. register device, send scheduled push);
Additional plugins can be downloaded from here and installed separately. Before to buy a subscription check here if what you need is already available, or submit a support request.
It is also possible to give it a try downloading and installing jBackend Community for free, a lite version created to give a chance to test jBackend capabilities, to develop and test new modules, and to provide some basic REST API integration features to a Joomla site.
jBackend is released under GPL 2.0 license.

Introduction
Tag Meta is a Joomla native extension that allows you to efficiently manage site meta tags. Tag Meta allows to set the tag 'title' and the meta tags 'description', 'author', 'keywords' and 'robots' on each page, which is identified by the URL or a part of it. Also other meta information like the rel ‘canonical’ are supported, and there’s a customizable database of synonyms for each group of keywords, that can be used to enrich pages. This provides a powerful tool to improve site positioning in SEO optimization.
It was initially created because many Joomla extensions didn’t provide a way to set meta info on their pages, and in these cases Tag Meta helps you to do this. With the introduction of macros and placeholders that allow complex data manipulation now Tag Meta can be also used to improve site's SEO ranking and get some other advanced "things".
For best SEO results, remember to always use meaningful text for title and description, concerning content of the pages, and also remember to insert comma separated list of keywords (no spaces needed). Finally, it is recommended to enable native Joomla SEF routing to generate friendly URLs and simplify the site structure, improving both SERP positioning and meta info management.
How it works
Tag Meta package includes a component for managing list of rules for site's URLs, and a plugin that analyzes all requests and sets the meta information as defined by rules. These are the main steps to start using Tag Meta (for the impatient):
- Install the package using Joomla Administration interface;
- Enable the plugin "System - Tag Meta" and set its ordering and other parameters;
- Use Tag Meta component to manage rules for meta info and synonyms database.
Detailed instructions on each step are described in the following paragraphs. In this section we just want to focus on some basic concepts related to Tag Meta and how it works.
The first important thing to understand is what a "rule" is. With Tag Meta Manager (the component interface) you can create as many items as you want, and each item is a meta info rule. But not necessarily an item corresponds to a single page (i.e. matches just a single URL).
A rule has a "URL" field that can be full URI or just a part of it. For example, if the "URL" field is "/home.html", then this rule matches both the URL http://www.mysite.com/home.html and http://www.mysite.com/orders/home.html?view=status. So, it means that with a single rule it is possible to match multiple source URLs. But the content of the "URL" field can be a regular expression, and this provide a powerful way to specify complex search patterns for matching URL. In the next paragraphs will be shown many regular expression examples.
For any request on the site, the Tag Meta plugin compares the requested URL with all the rules enabled. All matching rules are applied in the sequence defined with rules ordering. The "Last rule" flag controls if the current rule must be the last or not, so when multiple rules are applied the process ends if a rule has this field set to true. This provide a way to "pile" meta information from multiple rules for each page (e.g. some values come from the "category rule", other from the "single item rule").
Installation procedure
Tag Meta extension has just one package to download and install. The package includes a component and a system plugin, and supports the installation with "upgrade" mode, so there's no need to uninstall any previous version of Tag Meta.
To install Tag Meta, login to Joomla backend as administrator, and go to menu "Extensions manager". Click the browse button, select the package file (TagMetaX.XCommunity.zip or TagMetaX.XEnterprise.zip) and click the installation button.

That’s all. Now we are ready to start using Tag Meta.
Upgrade procedure
When upgrading from a previous version of Tag Meta, there is no need to first uninstall the old package. As mentioned earlier, Tag Meta supports the "upgrade" mode for the installation, so it is enough to just install the new package over the old one, both component and plugin will be upgraded.
Note that during the upgrade also the database tables are upgraded when needed, but without to delete or loose any table data. It is in charge of the installation process to upgrade tables structure as needed. All the rules will be preserved.