Tag Meta for Joomla 2.5 (5)
Tag Meta for Joomla 2.5
Tag Meta extension has just one package to download and install. The package includes a component and a system plugin, and supports the installation with "upgrade" mode, so there's no need to uninstall any previous version of Tag Meta.
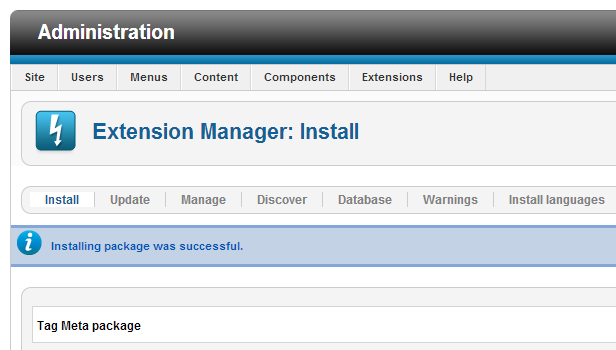
To install Tag Meta, login to Joomla backend as administrator, and go to menu "Extensions manager". Click the browse button, select the package file (TagMetaX.XCommunity.zip or TagMetaX.XEnterprise.zip) and click the installation button.

That’s all. Now we are ready to start using Tag Meta.
Upgrade procedure
When upgrading from a previous version of Tag Meta, there is no need to first uninstall the old package. As mentioned earlier, Tag Meta supports the "upgrade" mode for the installation, so it is enough to just install the new package over the old one, both component and plugin will be upgraded.
Note that during the upgrade also the database tables are upgraded when needed, but without to delete or loose any table data. It is in charge of the installation process to upgrade tables structure as needed. All the rules will be preserved.
Tag Meta is a Joomla native extension that allows you to efficiently manage site meta tags. Tag Meta allows to set the tag 'title' and the meta tags 'description', 'author', 'keywords' and 'robots' on each page, which is identified by the URL or a part of it. Also other meta information like the rel ‘canonical’ are supported, and there’s a customizable database of synonyms for each group of keywords, that can be used to enrich pages. This provides a powerful tool to improve site positioning in SEO optimization.
It was initially created because many Joomla extensions didn’t provide a way to set meta info on their pages, and in these cases Tag Meta helps you to do this. With the introduction of macros and placeholders that allow complex data manipulation now Tag Meta can be also used to improve site's SEO ranking and get some other advanced "things".
For best SEO results, remember to always use meaningful text for title and description, concerning content of the pages, and also remember to insert comma separated list of keywords (no spaces needed). Finally, it is recommended to enable native Joomla SEF routing to generate friendly URLs and simplify the site structure, improving both SERP positioning and meta info management.
How it works
Tag Meta package includes a component for managing list of rules for site's URLs, and a plugin that analyzes all requests and sets the meta information as defined by rules. These are the main steps to start using Tag Meta (for the impatient):
- Install the package using Joomla Administration interface;
- Enable the plugin "System - Tag Meta" and set its ordering and other parameters;
- Use Tag Meta component to manage rules for meta info and synonyms database.
Detailed instructions on each step are described in the following paragraphs. In this section we just want to focus on some basic concepts related to Tag Meta and how it works.
The first important thing to understand is what a "rule" is. With Tag Meta Manager (the component interface) you can create as many items as you want, and each item is a meta info rule. But not necessarily an item corresponds to a single page (i.e. matches just a single URL).
A rule has a "URL" field that can be full URI or just a part of it. For example, if the "URL" field is "/home.html", then this rule matches both the URL http://www.mysite.com/home.html and http://www.mysite.com/orders/home.html?view=status. So, it means that with a single rule it is possible to match multiple source URLs. But the content of the "URL" field can be a regular expression, and this provide a powerful way to specify complex search patterns for matching URL. In the next paragraphs will be shown many regular expression examples.
For any request on the site, the Tag Meta plugin compares the requested URL with all the rules enabled. All matching rules are applied in the sequence defined with rules ordering. The "Last rule" flag controls if the current rule must be the last or not, so when multiple rules are applied the process ends if a rule has this field set to true. This provide a way to "pile" meta information from multiple rules for each page (e.g. some values come from the "category rule", other from the "single item rule").
Version 1.9.1:
- Fixed REGEP BINARY query error with MySQL 8.
Version 1.9.0:
- Added macros {camelcase}, {ucwords}, {synonyms} and {nodevalue}.
Version 1.8.0:
- Improved autokeywords generation;
- Changed some code for PHP 7 compatibility.
Version 1.7.8:
- Fixed an issue with pagination;
- Document info now updated after each rule to fully support cascading rules.
Version 1.7.7 (only for J3):
- Added rule condition to skip rule;
- Improved the rules view.
Version 1.7.6:
- Fixed an issue with radio buttons in the rule save (only for J3).
Version 1.7.5:
- Fixed an issue with filter in search tools on rules and synonyms;
- Improved route_url() function;
- Fixed an issue with drop_query_vars() function;
- Fixed an issue with {tableselect};
- Fixed an issue with {autokeywords}, {autokeywords2} and {autosentence};
- Fixed an issue with {requestvar}.
Version 1.7.4:
- Fixed code for PHP 5.5 deprecated preg_replace /e modifier;
- Fixed issue with {queryvar} macro;
- Fixed issue with {substr} macro;
- Added macros {queryappend}, {querybuildappend} and {querydropappend};
- Added macros {username} and {userid};
- Added macros {preg_subject} and {preg_placeholder};
- Added macros {lowercase} and {uppercase}.
Version 1.7.3:
- Improved macro {queryfull};
- Added field custom header to add any custom meta tag to the html head;
- Added support for meta robots ydir;
- Fixed an issue with macro {autosentence} (thanks to Diego for reporting);
- Improved macro {routeurl} for the unwanted variables removal;
- Added macros {urldecode}, {rawurldecode}, {urlencode} and {rawurlencode};
- Added macro {str_replace};
- Added macro {placeholder_select} (only for Enterprise);
- Added button to reset statistics (hits and last visit);
- Added a tracing option to print information on the console log (like routed URL variables and rules applied);
- Fixed and issue with utf8_decode used with urldecode;
- Added macro {pathfolder} (only for Enterprise).
Version 1.7.2:
- Impreved macro {routeurl} to support menu items;
- Now is possible to remove variables (!var) in the macro {routeurl};
- Added macro {autosentence m,M};
- Added macro {substr start,length}text{/substr};
- Added macro {strip_tags}text{/strip_tags};
- Added macro {extract N}text{/extract};
- Added macro {extractp N}text{/extractp};
- Added macro {extractdiv N}text{/extractdiv}.
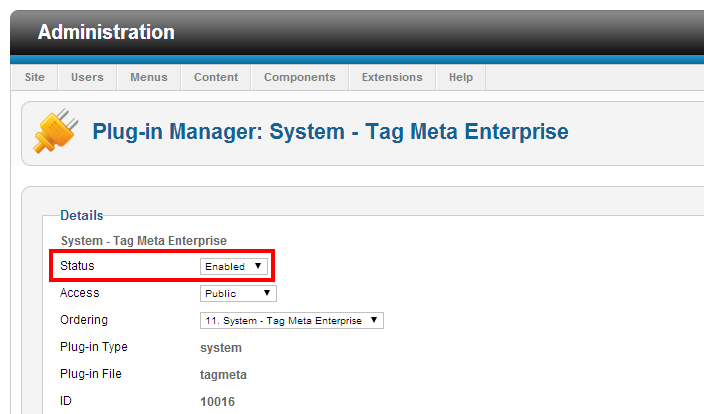
The first thing to do is to enable Tag Meta plugin. To enable the plugin go to menu "Extensions" -> "Plug-in Manager", find a system type plugin named "System - Tag Meta Community" or "System - Tag Meta Enterprise" in the plugin list, and click on it to access to plugin settings. Set "Status" to “Enabled”, and set other parameters on the right side according to your needs. Look at "Plugin settings" paragraph for detailed information about each parameter. Click on "Save & Close" button and check that the plugin is now enabled.

Remember that is the plugin that "does the work". The Tag Meta component is just the administrative interface for managing meta rules an other features, but is the plugin that checks site requests and performs meta enhancement when needed. So, the very first thing to do is to enable the plugin. Note that if you need to disable Tag Meta, just disable the plugin.
Another thing to check is the plugins order that can be very important, especially if there are some other plugins that mess with page's meta information. In most cases it is better to set Tag Meta as the last system plugin, so it will be the last to be executed and to madofy page content. Now Tag Meta is ready to work! You can now create your first meta rule, and test the result through the web browser. Be careful that you could get a cached page. To avoid this just clear server-side cache from backend (menu "Maintenance" -> "Clean Cache"), and client-side cache from your web browser.
